Showing posts with label chocolate. Show all posts

Sunday, March 8, 2009

Earth Muffin Family & Friends III: (Double Chocolate Cinnamon) Bread for Noodle

I don't have a system for posting here and so I tend to forget you, blog, for weeks on end. This week I also missed the February Daring Bakers challenge (you can see some lovely flourless chocolate cakes and ice cream over at A Charmed Life and Dad ~ Baker & Chef).

One thing I don't often forget (although my mother's account may differ marginally) is my family. As previously mentioned, my middle sister Anna, also known as Nanna Noo, Noodlehead, Noodle, and sometimes Noods (not the most appropriate nickname to holler across supermarket aisles, yes, I am speaking from experience) stayed with me for all of January and now I am missing her constant company. She's in her final semester of college, and student teaching, so her life becomes more and more fraught with anxiety with each passing day. I know this because I've been there. Well, without the student teaching.

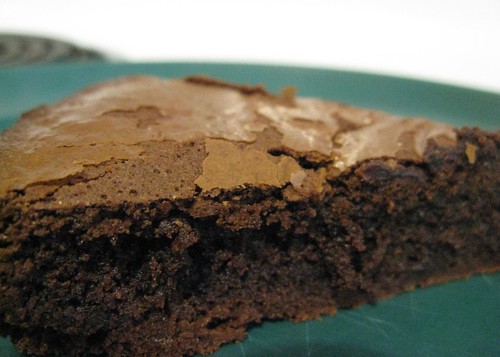
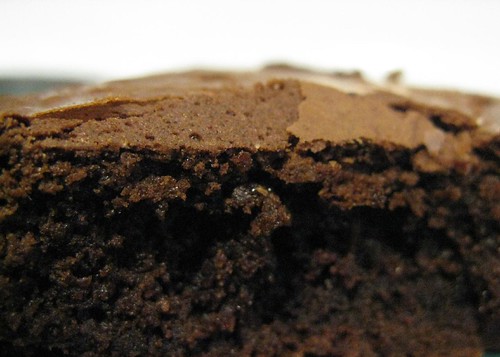
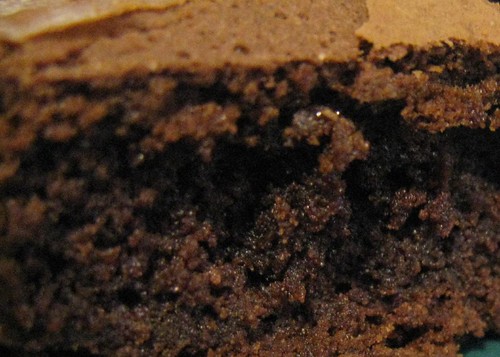
I constructed a care package for Noodle, which consisted of a heavily-stickered, reused toaster box, a hastily scribbled letter, and some of this bread, in muffin form. The muffins were the most vital part of the package, which is why I had to deceive the postal worker slightly, and inform her that the contents were not perishable. When they were. And also endure her ridicule upon viewing the heavily-stickered box.

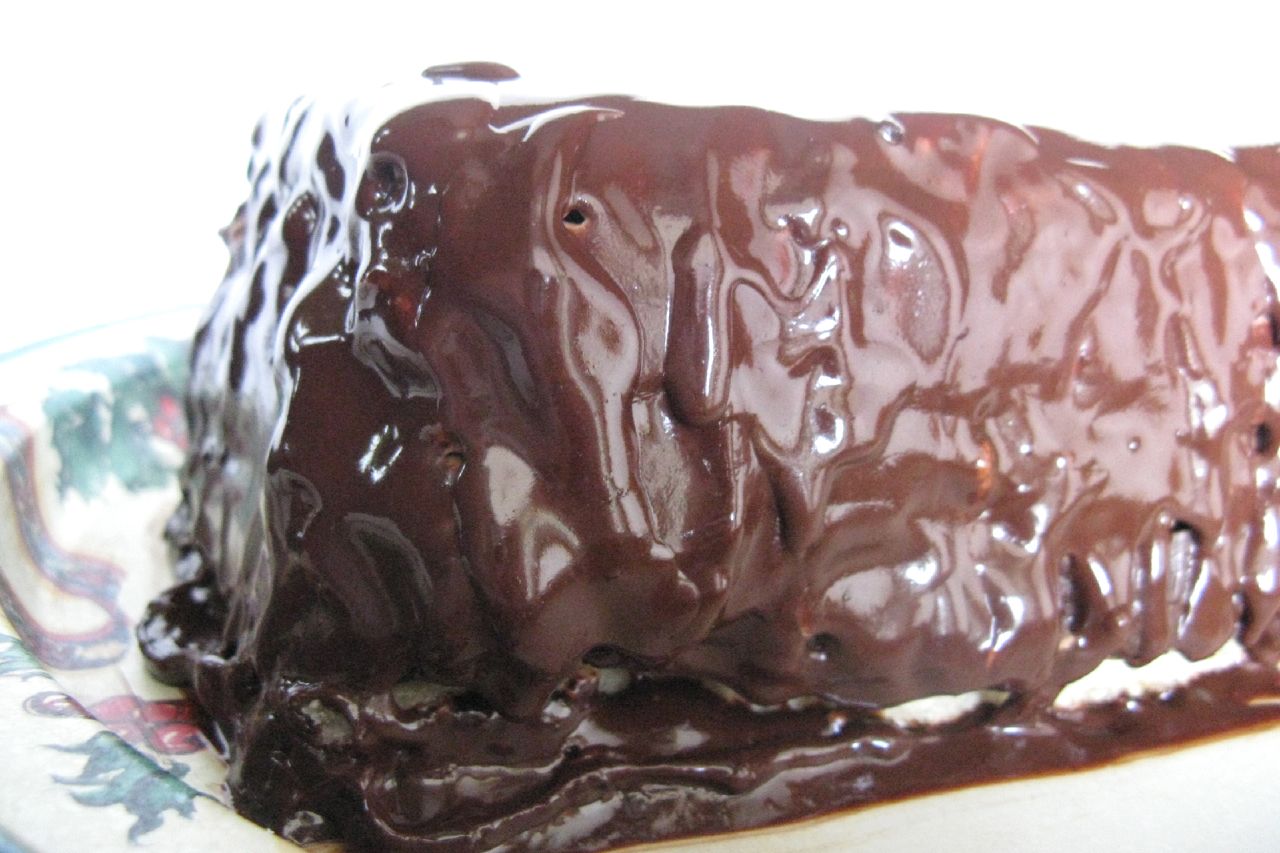
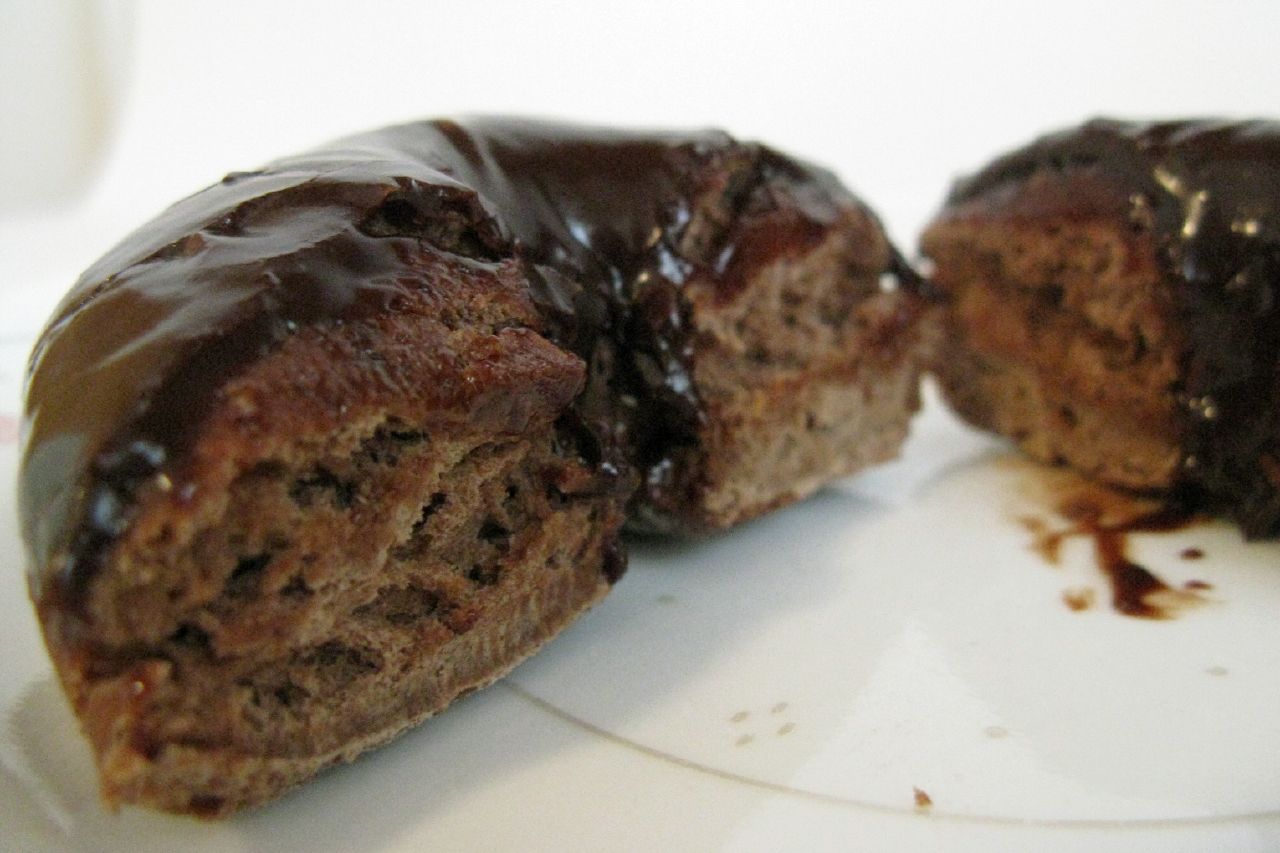
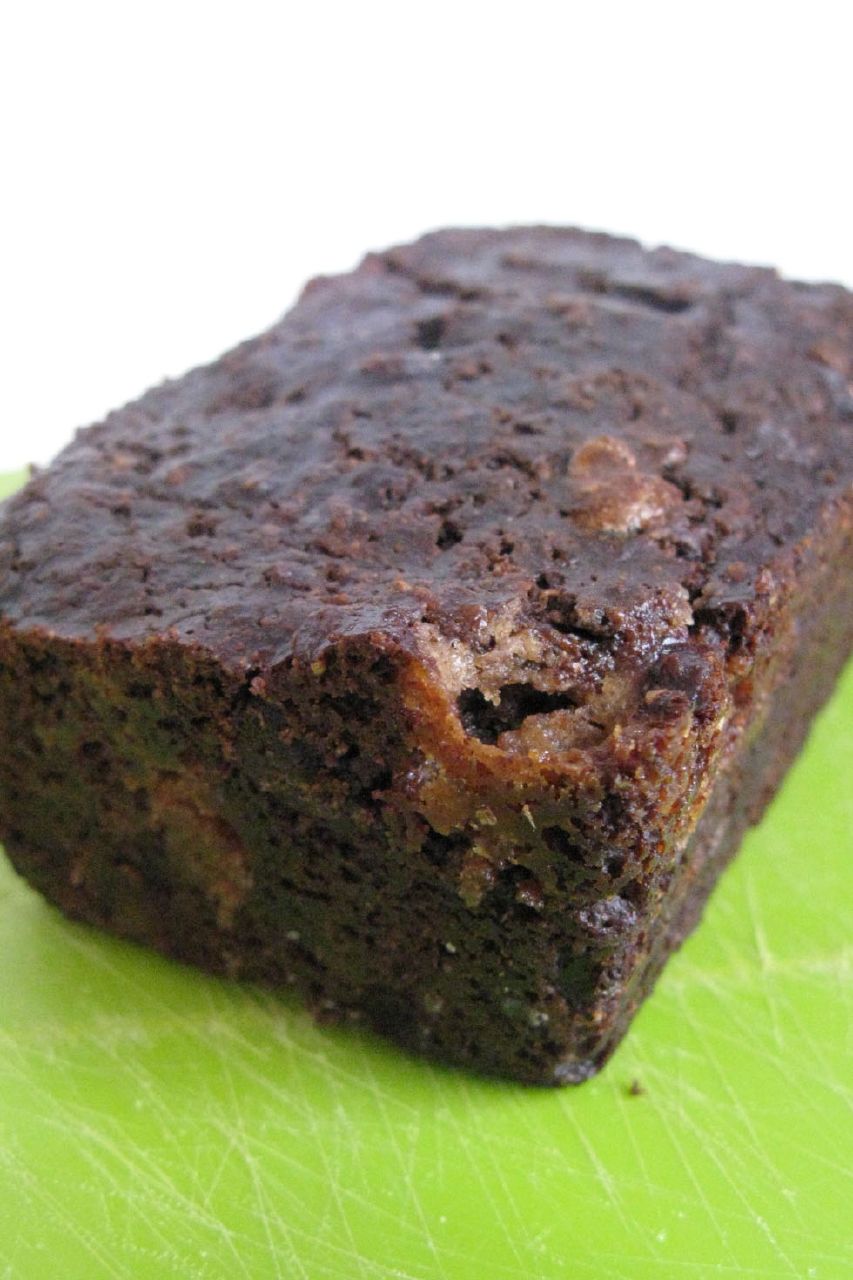
Double Chocolate Cinnamon Bread

1 1/2 cups milk
1 Tbsp. vinegar
1/4 cup butter, softened
1/4 cup applesauce
1 egg, beaten
1 banana, mashed
1 tsp. instant espresso, dissolved in 2 tsp. hot water
2 cups whole wheat flour
1 cup oats
1/2 cup cocoa
2/3 cup brown sugar
2 tsp. baking soda
1 1/2 tsp. salt
2 tsp. cinnamon
2 cups chocolate chips

1/4 cup butter, softened
1/2 cup brown sugar
1/2 cup whole wheat flour
2 tsp cinnamon

1. Preheat oven to 375 degrees Fahrenheit (400 degrees for muffins).
2. Beat sugar and butter in the bowl of an electric mixer, until fluffy.
3. Add applesauce, mashed banana, egg, milk, espresso and vinegar, one at a time.
4. Combine the dry ingredients in a separate bowl, and add slowly to wet, mixing only until damp (mixture should remain lumpy).
5. Stir in chocolate chips.
6. Mix remaining ingredients together to make cinnamon streusel.
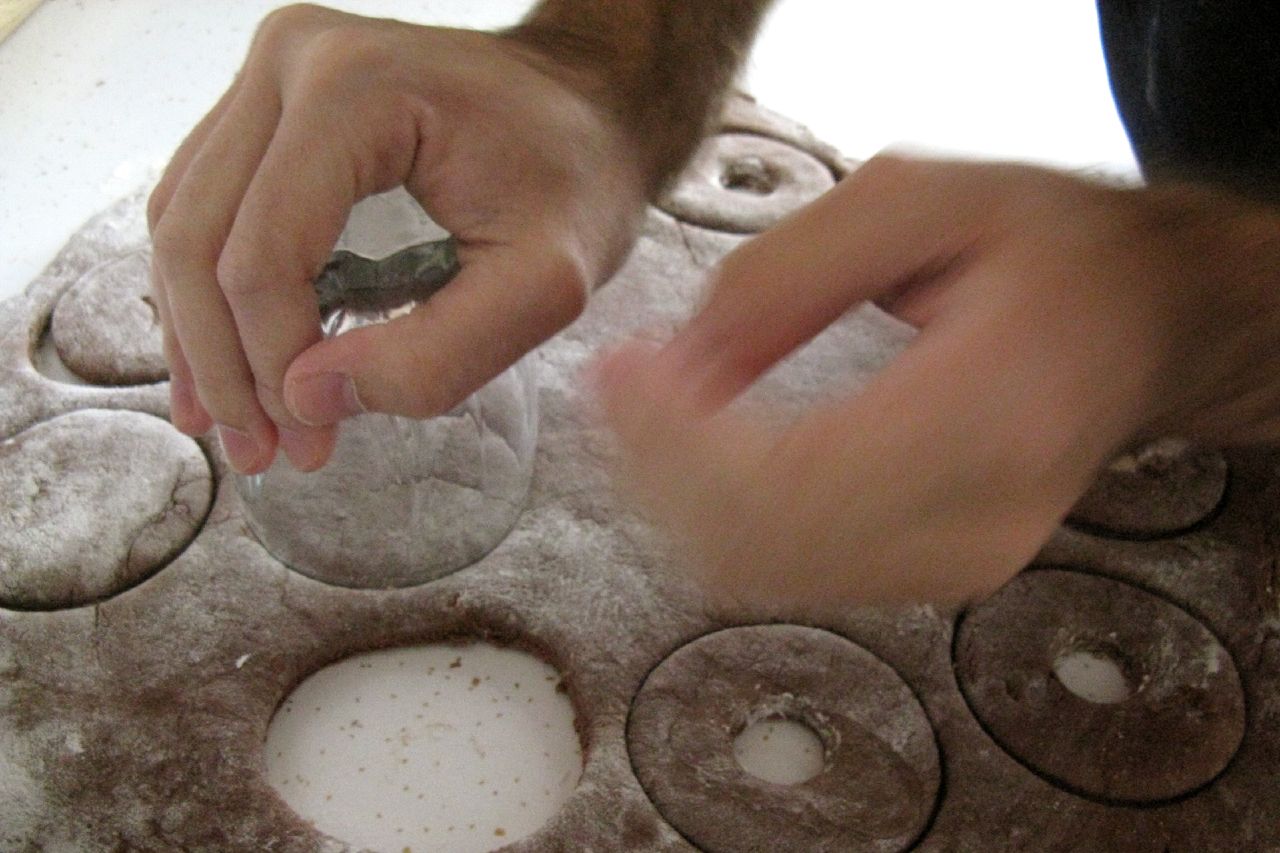
6. Fill greased mini loaf pans 1/2 way with batter. Sprinkle streusel over batter, and add more batter to fill pans about 3/4 high.
7. Bake for 20 to 30 minutes, or until toothpick inserted in center of loaf emerges clean (muffins will take 15 to 20 minutes at 400 degrees).

Thursday, February 12, 2009

Lopsided with Love: Dark Chocolate V-day Cake

Valentine's day also happens to be my littlest sister's birthday. And while I no longer really enjoy the merchandising that accompanies this holiday, and rarely celebrate it, you can imagine my profound shock and horror at six years old when she emerged from the womb, hollering indignantly (she has been doing this ever since), on this special day. Where was our table full of chocolates and gifts? (Our parents could get pretty lavish back then.) Why, Julia was the present this year! And so it was for the rest of our childhood. We soon recovered, though, because Julia was a very cute baby.

ANYWAY I have been dreaming about this cake for weeks. I mean, the concept of this cake. Dark, moist, simple cake. Sweet, shining icing. Pink against brown. It was an appropriate time of the year to be desirous of this combination. I made it a week in advance because I was so eager.

Dark Chocolate V-day Cake

3 oz. semisweet chocolate
1 cup milk
1 cup brown sugar
3 egg yolks
2 egg whites
1 1/2 cups flour
1/2 cup cocoa
1 tsp baking soda
1 tsp salt
1 cup sugar
1/2 cup butter, softened
1/4 cup water
1 tsp vanilla

1. Preheat the oven to 350 degrees.

2. In a saucepan, melt the chocolate (I used chips), 1 egg yolk, brown sugar, and 1/2 cup of the milk, over low heat. Allow to cool.

3. Combine sugar and butter in the bowl of an electric mixer.

Mix until fluffy.

4. Add the remaining egg yolks, one at a time.

5. Add the cooled chocolate mixture.

6. Combine dry ingredients (flour, cocoa, soda, and salt) in a separate bowl.

7. Combine water, the remaining milk, and vanilla.

8. Add this mixture to the mixer bowl, alternating with dry ingredients.

9. Beat the egg whites until stiff peaks are formed. Fold into the batter.

10. Place batter in two greased 8" round pans.

11. Bake for 20 - 30 minutes. Remove from oven and allow to cool.

Pinkish-Red Vanilla Icing

1/2 cup butter, softened
1 tsp vanilla
1 dash salt
1/4 cup milk (more if needed)
1 lb. powdered sugar
1 tube red gel food coloring, and one drop blue coloring

1. Beat butter, salt, and vanilla with the whisk attachment on an electric mixer.
2. Alternately add the sugar and the milk until icing is thick and smooth.
3. Squeeze that ENTIRE tube of food coloring (and a little bit of blue) into the frosting. What a lovely color!

4. Cover your first layer with frosting, then add the second. Proceed to panic because it's a lopsided mess. Resign yourself to its imperfect beauty, after panic attack has subsided.

(Special thanks to my tolerant and helpful assistant/boyfriend).

Hope your Valentine's day includes something as delicious as this cake!

Tuesday, December 30, 2008

Daring Bakers: French Yule Log

For this month's taxing challenge, I was able to acquire the assistance of my favorite second-in-command.

This is my littlest sister Julia. She is patient, calming and helpful. In the kitchen, anyway. And I was extremely fortunate to have her; I wouldn't recommend this recipe to any single baker!

This month's challenge is brought to us by the adventurous Hilda from Saffron and Blueberry and Marion from Il en Faut Peu Pour Etre Heureux. They have chosen a French Yule Log by Flore from Florilege Gourmand.

Of the many options provided by Hilda and Marion, I selected a milk chocolate whipped cream for the base of the log, with a chocolate crème brulée insert, a coconut crisp layer, and a dark chocolate ganache and almond dacquoise layer at the bottom. The layers were covered with a dark chocolate icing.

I won't repost the recipe here (you can find it at Saffron & Blueberry), but for those overwhelmed by the complex nature of this concoction, I'll detail the process I used, which covered the span of two days. First, I put together the crème brulée and baked it in the oven. Meanwhile, I mixed the milk chocolate whipped cream and placed it in the refrigerator to cool. I used a toaster oven to toast the coconut for the crisp layer, and mixed the rest of it, spreading it between wax paper to harden. I also baked the almond dacquoise in the toaster oven (multi-tasking!). When the crème brulée finished baking, I placed it in the fridge for one hour. When it had hardened, I whipped the milk chocolate cream and assembled the first part of the log. I allowed it to freeze for several hours, then mixed the dark chocolate ganache and added it, along with the almond dacquoise layer. The next day, I removed the frozen log from the freezer and covered it with the dark chocolate icing. This may sound daunting, but it's fairly enjoyable and fast-paced with two people. The most difficult part, by far, was the waiting!

My favorite portions of the log were the milk chocolate whipped cream and the dark chocolate icing. I will most definitely use these again. I also enjoyed the coconut crisp layer, for which I used white chocolate, coconut, and crushed Special K! This would be a great candy by itself.

Due to my own impatience and lack of a proper pan, this is not the most immaculate of yule logs, but this in no way affected the taste!

Thursday, December 4, 2008

Another Berry Recipe: Multigrain Chocolate Raspberry Muffins

This will be my third iteration of a recipe involving chocolate and berries. Although I'm attempting to diversify my baking repertoire, my choices are severely limited by money, time, and the tastes of those who consume my recipes. Additionally, I am fond of experimenting with whole grains.

One of my favorite ingredients is Bob's Red Mill 8 grain hot cereal. The price on their site is $3.45, but it's often on sale at Shaw's, and I make porridge with it on cold mornings, and put it in so many of my baked goods. If you can't find this, any hot cereal or grain will do, including plain oats.

The frozen raspberries in this recipe are also relatively cheap, and an amazing way to remind one of summer. Which seems, by the way, too far gone to remember. I suggest you eat these warm out of the oven to avoid contemplating the fact that we have 5 MONTHS left of these dismal weather conditions. Those of us who live in the Northeast, that is.

Whole Grain Raspberry Chocolate Chunk Muffins

3/4 cup milk
1/4 cup butter, melted
1 egg, beaten
1 cup whole wheat pastry flour
3/4 cup 8 grain hot cereal
1/3 cup turbinado sugar
2 1/2 tsp. baking powder
3/4 tsp. salt
1 cup chips

1 package frozen raspberries
8 oz. chopped dark chocolate

1. Preheat oven to 400 degrees.
2. Combine milk, butter, and egg.
3. In a separate bowl, mix flour, sugar, powder, and salt.
4. Add dry ingredients to wet, mixing just until moist. (Leave it lumpy!)
5. Fold in chips and raspberries.
6. Divide batter into greased muffin tins. Bake for 18 minutes, or until a toothpick inserted in center comes out clean (apart from some gooey, delicious melted chocolate).

Monday, November 24, 2008

Baked Chocolate Doughnuts

As previously mentioned, last weekend my friend Ashley and I bought a huge (1 lb.) chunk of bittersweet Callebaut couverture chocolate at Whole Foods. Our intention was to create chocolate lava muffins! but a busy weekend and several filling meals obstructed this plan. Instead, I chopped the block (roughly) in half on Sunday morning, and we went our separate ways.

Ashley made this amazing (looking) Pain au Chocolat, while I gradually agonized over recipes for a week. On Saturday morning, I had finally decided on chocolate baked yeast doughnuts.

I have a confession to make. These did not turn out as well as I had hoped. However, I'm writing about them since (a) I think you ought to be aware of my failures, (b) the pictures look yummy! and (c) most of all, I think these have promise, and plan to make them again with several alterations, of which I will make note.

Baked Chocolate Doughnuts
Adapted from Heidi's recipe at 101 cookbooks

1 1/3 cups warm milk, 95 to 105 degrees
1 packet instant yeast (if you want to use active yeast, dissolve it in 1/3 cup of the warm milk first)
2 tablespoons butter, melted
2/3 cup sugar
2 eggs
3 cups flour (the original recipe calls for 5 cups. I cut it down to 4 because I was adding some cocoa powder. This was TOO MUCH FLOUR. So I'm reducing it to 3 cups here, and more can be added if necessary.)
3/4 cups cocoa powder
2 oz. bittersweet chocolate, chopped and melted. (I put the chocolate in the microwave for 20 seconds, removed, and stirred until smooth.)
1 teaspoon salt

1. In the bowl of an electric mixer, beat butter and sugar together. Add milk, eggs, and melted, cooled chocolate.
2. Combine the dry ingredients (flour, cocoa, salt, and instant yeast) in a separate container. Gradually add to wet ingredients, stirring by hand, until fully combined.
3. Beat the mixture with the dough hook attachment of an electric mixer, on medium, for several minutes. Add more flour if too wet, more warm milk if too dry. Ideally the dough should "pull away from the sides of the mixing bowl and eventually become supple and smooth."
4. Place the dough into a warm, buttered bowl. Allow to rise for 1 hour. (TIP: I think I've said this before, but my favorite place to let dough rise is in the microwave. I put a damp towel in for thirty seconds, then remove. One dry towel goes over the dough, and the damp, warm towel goes on top of that. Then I put the whole container into the microwave and UNPLUG IT because you never know who might mess with it accidentally.)
5. Turn the dough out onto a floured surface. Roll out until 1/2 inch thick. Cut the doughnuts! I do not have a fancy doughnut cutter, so my assistant and I used a glass and an empty cream soda bottle.
6. Allow the doughnuts to rise for 1 more hour (I use the same method as the first time).
7. Preheat oven to 375 degrees Fahrenheit. Bake the doughnuts for 7 minutes or so. They should be slightly under-cooked! I also baked the doughnut holes for about 3 minutes each.
8. Glaze. I used Alton Brown's chocolate glaze recipe, substituting 1 Tbsp honey for the corn syrup, and it was delicious! Beware, though, it will make twice as much as necessary and you will be continually tempted to stick your finger in it, eat it with a spoon, pour it over fruit...

As I mentioned above, I think the problem with my doughnuts was too much flour. Next time, I will start low and work my way up. I'm also going to try adding slightly more butter and sugar, to increase the richness of the dough. I will let you know how that goes!

Wednesday, November 19, 2008

Basics Part II: Chocolate Cake

I have several recipes for chocolate cake filed away, some from family, others from blogs, still others I've created on my own, or adapted. I discovered this particular recipe when I was searching for a simple and easy way to make chocolate cake: no buttermilk, no beaten egg whites, and no difficult methods. I was living in an apartment I hated, with no electric mixer or quality measuring tools. My need for dessert was pressing. This cake saved me.

I originally baked this in an 8-inch square pan, and drizzled it with a simple glaze. Most of the pieces I cut went straight into the freezer. This, I reasoned, would prevent me from consuming the entire cake in one sitting. As it turns out (lamentably), this perfect concoction is also delicious frozen. I may have to fashion it into cakesicles one day soon.

Perfectly Simple Chocolate Cake

The recipe I give here is with sour cream chocolate frosting, as pictured.

1 cup flour (all purpose or whole wheat pastry)
1 cup sugar (white or turbinado)
1/4 cup butter or margarine (I use Earth Balance)
1/2 cup buttermilk
1/4 cup coffee (optional--if you omit the coffee, use 3/4 cup buttermilk)
1/2 teaspoon baking soda
1/2 teaspoon salt
1/2 teaspoon vanilla
1 egg
2 oz. unsweetened chocolate

1. Preheat oven to 350 degrees.
2. Melt the chocolate in a pan with the butter. Let cool.
3. Combine sugar, coffee, and buttermilk.
4. Add egg and vanilla, then chocolate mixture.
5. Sift the dry ingredients (flour, baking soda, and salt) together and add slowly.
6. Pour batter into greased 8" square pan and bake for 25 minutes, or until toothpick/knife inserted into center comes out clean

Chocolate Sour Cream Frosting

1/3 cup butter
3 oz. unsweetened chocolate
1/2 cup sour cream (TIP: I usually use fat-free for this, and find that it tastes just as good! This goes for most dairy--milk, yogurt, or sour cream--found in recipes.)
2 tsp. vanilla
2-3 cups powdered sugar

1. Melt butter and chocolate in saucepan over low heat. Allow mixture to cool.
2. Stir in sour cream and vanilla.
3. Slowly add powdered sugar, 1/2 cup at a time, and beat until frosting is smooth and spreadable.

Over at Method, my friend Ashley has made some gorgeous vegan Pain Au Chocolat (chocolate croissants) with one half of a big hunk of bittersweet chocolate we purchased this weekend. Check them out, and stay tuned for my own recipe (coming this weekend)!

Friday, October 3, 2008

Missed Opportunities


I've only resided in my current city--Somerville, Massachusetts, for around three months. Imagine my surprise when I discovered that one of our claims to fame is the invention of Marshmallow Fluff!

My experience with this confection is limited to several consecutive Christmases of making fudge for all of my friends in high school. This practice became cumbersome in terms of packaging and delivery, and caused a distressing amount of contention, especially among the non-recipients.

This was over five years ago and am I still dwelling on it? AFFIRMATIVE.

There is a Marshmallow Fluff festival here in Somerville! Actually, the proper title is the "What the Fluff" festival. I learned that the festivities included a cooking contest, and I immediately began to devise a recipe to enter. I had a leftover sweet potato in the refrigerator, and I decided to combine these ingredients with another New England favorite: whoopie pies.

Unfortunately, the day of the festival, it rained. And on the rain date (the following day), it also rained. They still held it (you "can't stop the fluff!") but I could not muster up the strength to drag myself out of bed. It may have had something to do with the fact that I was engrossed in a new book, or that I would have been forced to ride my bike three miles in the downpour to actually attend the contest.

What the fluff! I brought these to work, instead. After eating half of them myself.

Chocolate Covered Sweet Potato Whoopie Pies with Marshmallow Fluff Filling

Sweet Potato Cookie
Adapted from a pumpkin cookie recipe in Martha Stewart's Cookies

1 1/2 c. flour
1/2 tsp. baking powder
1/2 tsp. baking soda
3/4 tsp. salt
1 tsp. cinnamon
3/4 tsp. ginger
1/2 tsp. nutmeg
6 Tbsp. butter (3/4 stick)
1 1/8 c. brown sugar
1 egg
3/4 c. cooked, mashed sweet potatoes (NO sugar or milk--just mashed potatoes)
1/2 c. evaporated milk
1/2 tsp. vanilla

1. Preheat oven to 375 degrees.
2. Whisk dry ingredients together.
3. Combine butter and sugar. Beat until fluffy.
4. Add egg, sweet potato, milk, and vanilla one at a time,
5. Add dry ingredients, gradually.
6. Spoon batter onto lightly greased cookie sheet. It will be very wet; this is okay!
7. Bake for 8-12 minutes, depending on size of cookie. (TIP: When making sandwich cookies such as these, it's vital to make them all the same size! You want them to match up. I learned this the hard way...)
8. Allow to cool as you mix filling!


Marshmallow Filling

1 7-oz. jar of Marshmallow Fluff
3/4 c. (1 1/2 sticks) butter
1 1/2 tsp. vanilla
2-3 cups powdered sugar

1. Whip fluff and butter together until creamy. (TIP: I greased my fingers and the spoon before I attempted to extract the fluff from the jar. This made it about 5 times easier.)
2. Add vanilla, and sugar 1/2 cup at a time until desired consistency is achieved. Frosting should be very stiff.
3. Spread on the bottom of one cookie. Sandwich another cookie on top.
4. Place sandwiched cookies in the refrigerator on a cookie sheet to set.

Chocolate Coating
This recipe made enough to coat about 2/3 of the whoopie pies. I liked the taste of the plain ones, too, but if you want to cover them all, you can multiply the recipe by 1.5.

1 12-oz. bag of chocolate chips
1 Tbsp vegetable oil

1. Heat the vegetable oil in the bottom of a medium pot.
2. Add the chips and stir over medium heat, until smooth.
3. Remove your whoopie pies from the fridge, dip in chocolate, and place on cookie sheet. (TIP: you may want to use your finger to smooth the chocolate coating on top, once you've placed the pie on the cookie sheet.)
4. Place in refrigerator to set. I found it easier to keep these refrigerated the whole time, actually.

Here is an example without chocolate coating (equally delicious!):

Wednesday, August 27, 2008

Basics Part I: Yellow Cake

For most of my life, I've turned my nose up at the idea of vanilla cake. Maybe I'd simply associated it with cake mixes, with the infinite parade of brightly frosted birthday sheet cake monstrosities of my youth. And, as a chocoholic born and raised, I'm of the opinion that there is NEVER a superior alternative to chocolate.

However, I do occasionally accept requests from one of my innumerable admirers, and recently I baked a "confetti" cake, using this Yellow Sheet Cake recipe from Baking Bites, and mixing in a cup of sprinkles before baking. The cake itself was divine; the buttercream icing I attempted, not so much.

And so, true to form, I hastily made the cake again, this time in the form of cupcakes, and added--what else?--chocolate.


The most interesting thing about this cake recipe is the method in which it is mixed. From Baking Bites:

"Beating the butter into the dry ingredients gives the finished cake a beautiful and tender crumb, inhibiting gluten development by creating a protective coating of fat around the flour. Beating the flour/butter mixture with some of the eggs gives the remaining gluten a chance to develop and incorporate air into the cake."

This is by far the lightest, fluffiest cake I have ever made without buttermilk. It has become my designated, go-to vanilla cake recipe.


Yellow Sheet Cake recipe from Baking Bites. I adapted this only in that I made two 8-inch round cakes, or 24 cupcakes, as opposed to one 9 x 13 cake.

Simple Chocolate Frosting

2 (1 ounce) squares unsweetened baking chocolate
1/2 cup butter
6 tablespoons milk
3 cups confectioners' sugar
1/2 cup cocoa
1 teaspoon vanilla extract

1. In a saucepan, melt the butter and baking chocolate. Let cool.
2. Combine with milk, vanilla, and cocoa in an electric mixer (a handheld one is fine, as well).
3. Add confectioners' sugar (1/2 cup at a time).

TIP: You may need to adjust the amount of sugar or milk. The frosting should be spreadable but hold its shape easily when applied.


PS: I have been on vacation these past couple of weeks. I hope to post once a week from now on!

Monday, August 4, 2008

Martha Stewart


I am in the process of forming my own definitive cookbook collection. This means that I own about 15-20 cookbooks, half of which are truly useful. The other half are gifts or hand-me-downs or book sale purchases that are pretty to look at, but haven't provided me with any solid recipes. Among the good ones I own: How to Cook Everything Vegetarian, The Joy of Cooking (a battered 1964 edition), Moosewood's Simple Suppers, and The New Food Lover's Tiptionary.

Books I still want to aquire: Heidi Swanson's cookbook, The Cake Bible, and Baking from My Home to Yours.

This post is about Martha Stewart! I have been desirous of her book, "Martha Stewart's Cookies," for so long, and have dropped so many hints, that my mother finally bought it for my birthday. I am in love with Martha's system of organization, and the beautiful pictures that accompany each recipe. While I'm not crazy about her level of perfectionism (I.E., "beat the eggs in electric mixer on medium until pale, or 4 minutes,"), these are some amazing recipes. This is the first one that I attempted, slightly revised.


Double Chocolate Brownies
Adapted from Martha Stewart's Cookies

6 Tbsp butter
6 oz semisweet chocolate, coarsely chopped
1/2 cup unsweetened, Dutch-process cocoa powder
3/4 cup flour
1/4 tsp baking powder
1/4 tsp salt
1 cup sugar
2 large eggs
2 tsp vanilla extract

1. Preheat oven to 350 degrees.
2. Butter an 8-inch round cake tin. The original recipe calls for a square pan, but I wanted a sort of brownie-cake I could cut into slices.
3. Melt butter, chocolate, and cocoa powder in a pan. (TIP: I find that, when melting chocolate for baking purposes, it's sufficient to use a little butter and just melt it over a burner or in the microwave. The butter keeps it from scorching. Martha wants you to use a double boiler, or a "heatproof bowl over simmering water." In my opinion, this is totally unnecessary. As long as you keep stirring and make sure the butter has coated the pan, you'll be fine.)
4. Beat sugar, eggs, and vanilla together. Add cooled chocolate mixture.
5. Mix the dry ingredients with a whisk or fork. Add to the rest of the batter.
6. Spread the batter evenly into pan. Bake approximately 30 minutes, or until a toothpick or knife comes out with a few crumbs, but not wet. Allow to cool, and slice!


Here's another TIP: when you're making something like brownies, where the chocolate is the most important factor, use the best quality ingredients. Baker's chocolate will suffice if you're experiencing a major craving, but I would opt for something like Scharffen Berger, if possible. This goes for the butter and eggs, as well. You want to use fresh, good quality ingredients. Trust me. When I was in Mexico, I was persuaded to buy a giant glass bottle of pure vanilla extract. It has lasted me over a year and half, and has an incredible taste. I wish I could carry it everywhere with me. Anyway, the better your ingredients, the better the final product. This seems so simple, but I'm always forgetting it...

Next up on the brownie front: finding the best vegan brownie recipe out there!

Friday, July 25, 2008

Christmas in July


These muffins are an old favorite, made in the throes of an all-nighter I pulled during my senior year. I was attempting to draw connections between Freud and Shaffer's Amadeus, and the baked goods that emerged from this frenzy were far superior to the other product: a half-assed paper. Oh well.

On the upside, this recipe won a contest! Here is the proof: http://www.hotelchocolat.co.uk/src/12_realepic/favourite-chocolate-recipe-A12days/

They are also a nice change during the hot summer months, reminiscent of the holiday season while still being light and easy to mix up.


Chocolate Mint ("Candy-Cane") Muffins

This makes 12 little muffins or ten big.
TIP: If you leave some muffin cups empty, put a little water in them. This protects the pan from burning or warping.

3/4 c. milk
1 egg
1/4 cup butter

1/2 cup cocoa
1/3 cup brown sugar
1/4 cup white sugar
1/4 tsp baking soda
2 1/2 tsp baking powder
3/4 tsp salt
2 tsp instant espresso powder (optional but highly preferred--particularly when you need to stay up until 5 AM!)
1 1/4 cup whole wheat pastry flour

1 cup mint chocolate chips. (I used two different kinds of Andes pieces, white & red and green & chocolate.)

1. Preheat the oven to 400 degrees.
2. Mix the dry ingredients with a fork or whisk.
3. Melt the butter and mix in the egg and milk, adding the wet to the dry and mixing just until everything is damp. This is sort of my life motto: muffins are meant to be lumpy! That is the muffin method.
4. Spray the muffin pan with Pam, or grease with Crisco.
5. Bake for around 20 minutes, or until a knife or toothpick comes out clean.

Yes, I ultimately graduated, and I received in the way of prizes some Hotel Chocolat Pink Champagne Truffles (although I'm not a fan of alcohol in chocolates) and a beautiful cookbook with measurements entirely metric, by weight! I have to procure a kitchen scale.

Thursday, July 17, 2008

Nutty and Natural


I tend to prefer more "natural" ingredients, although if I need to bake, I will use whatever's on hand. I most often have Earth Balance (a vegan butter substitute) in my fridge for other uses, so that goes into a lot of the baked goods that I make. Likewise, I love to use turbinado or other natural or organic sugars, because they have an interesting crunch and a deeper flavor. These cookies have extra sugar sprinkled on top.

Natural Oatmeal Pecan Chocolate-Chunk Cookies

1 c. Earth Balance (or just butter, margarine, or crisco)
1 c. turbinado sugar (these would work with brown sugar, as well)
1/2 c. white sugar
1 1/2 tsp. vanilla
2 eggs, 1 egg yolk

1 1/2 c. flour
1/2 c. whole oats
1 tsp. baking soda
1 1/2 tsp. salt

2 semi-sweet chocolate bars, chopped. (I used Scharffen Berger because there was a sign at Trader Joe's that said "chop up for chocolate chunk cookies!" which sounded good to me. It is my favorite brand of chocolate to bake with but fairly expensive.)
1/2 cup pecans

1. Preheat oven to 375 degrees
2. Cream butter ("buttery spread") and sugar, add eggs and vanilla.
3. Mix dry ingredients separately, then incorporate.
4. Stir in chopped chocolate and pecans.
5. Scoop dough onto cookie sheet. TIP: I use two regular spoons, sprayed with Pam if the dough is extra sticky, to scoop. This keeps my hands clean (because you know I will eat anything left on my fingers).
6. Sprinkle turbinado sugar over each cookie.
7. Bake @ 375 for 13 minutes.

Makes 2-3 dozen cookies.

Friday, July 4, 2008

Chocolate, Peanut Butter, and Monopoly

I found a recipe a while ago for Peanut Butter Swirl Brownies, but was inspired by the idea of Nanaimo bars, a Canadian treat, and decided to turn these into something similar. Normally these are made with a brownie or cookie base, a custard layer, and soft chocolate on top. I guess what I made could not be called Nanaimo bars for several reasons, one of which is that the center layer was not custard, but the baked peanut butter component of the original recipe.

To further complicate matters, I adapted the recipe for a muffin tin.

As you can see from the photo, the peanut butter layer was not as fully articulated as I would have hoped. However, I can assure you that the most important facet of any baked good (the TASTE) was, in this instance, on point.

Chocolate Peanut Butter Brownies

Brownie layer

1/3 cup butter
2 oz. unsweetened chocolate
2/3 cup flour
1/2 tsp. baking powder
1/4 tsp. salt
2 eggs, beaten
1 cup sugar
1 tsp. vanilla

PB layer

1/3 cup peanut butter
2 Tbsp. butter, softened.
2 Tbsp. sugar
1 Tbsp. flour
1 egg, beaten

Chocolate layer

4 oz. semisweet chocolate
1 Tbsp. butter

1. Preheat oven to 350. Grease a 12-cup muffin tin.
2. Melt the butter and unsweetened chocolate in a saucepan or the microwave. Let cool.
3. Beat the eggs and sugar together and add vanilla.
4. Mix the dry ingredients (flour, powder, salt) and incorporate. Lastly, add the melted chocolate mixture.
5. Combine all the elements of the peanut butter layer.
6. Spoon brownie batter into muffin tin. Then, spoon peanut butter batter onto the brownies, spreading with a spoon to create a layer in each muffin cup.
7. Bake for 10 to 14 minutes. Remove and let cool (I put them in the freezer for a couple of minutes).
8. Melt the chocolate and butter for the final layer, and spread over the cooled brownies. Place in fridge until firm. If, unlike me, you can wait that long.

Play monopoly (the General Mills version which purportedly is a collector's edition) and annoy everyone by getting chocolate on the board.

Yummm!

PS: The Pillsbury doughboy, while he did happen to mingle at times with the finished product, had no part whatsoever in the preparation of these brownies.